Defects are hard to avoid but can be easily controlled. Plastic is replacing metal in almost all industries. So the demand for plastic molding is getting pace. Unfortunately, like metal parts, plastic parts also can have some defects.
It can be due to the manufacturing process, materials, material handling, or anything. So in this article, we will explore different injection molding defects, the causes of those defects, and what is the solution for them.
Plastic part defects are noticed in almost every type of molding process. But injection molding is leading the list as we know that injection molding is the most widely used plastic molding process.
Many times those defects can be easily avoided or at least can be controlled by a better part design, a better mold design, different materials, and different other steps that we will discuss in this article.
Factor Affecting Injection Molding Defects
Following are the key factor that affects the injection molding defects and can be easily controlled.
Injection Mold Material Selection
Selecting the right material is very important. For example, ABS has better moldability than PC. Some material has better shrinkage than the other. So choose a material that creates fewer defects in injection molding
Plastic Part Design Guidelines
We should always design the part using the best practice for designing plastic parts. For example uniform wall thickness, no undercut, proper rib thickness, proper boss height, and thickness, etc. Like that there are many best practices that we should follow so that there are fewer defects in the part
Injection Mold Design
Choosing the best type of mold remains one of the most important factors in injection molding defects. For example, hot runner mold creates fewer defects than cold runner mold. The gate location, the nozzle size, the flow line, injection pressure, etc plays a big role in reducing the plastic part defects.
1. Sink Mark
Sink mark occurs due to uneven wall thickness. The thicker area takes time to cool compared to the thinner area and that is why the material tries to sink and create impressions. It looks more or less like a concave sinkhole and contraction will happen in the direction of the thinner section. Sink marks are more noticeable on flat surfaces.
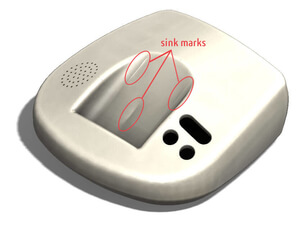
Causes
- Improper part design. The part should have uniform part thickness. If not, at least the transition of thickness change should be smooth.
- Poor cooling mechanism. Uneven cooling create sink mark
- Poor material choice. Few materials sink more than others. So need to choose material wisely.
- Low injection pressure
- Very high melting point of the plastic
Solution
- Unform wall thickness
- Adjust the cooling time
- Adjust holding time and pressure.
- Change the gate location
2. Flow Lines
Flow lines are also known as flow marks usually found in parts molded using injection molding. Those are basically off-tone wavy shape lines or patterns found on surfaces. This defect is due to uneven cooling on the surface when the material flows through the mold.

Causes
- Variation in cooling speed
- Slow injection pressure
- Low mold temperature
- Small size of gate and flow channel
Solution
- Increase the injection pressure and speed
- Increase the nozzle diameter
- Use hot runner mold
3. Weld Line
This defect occurs when two or more flow lines meet together but does not knit during the molding process and creates some convergent shape lines called weld lines. This happens in and around holes and creates a locally weak zone.
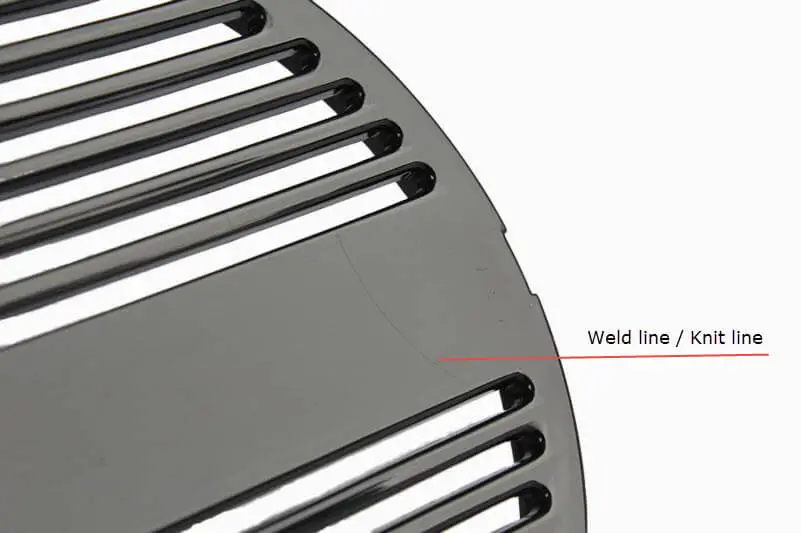
Causes
- Non-uniform wall thickness
- Holes, bosses, ribs not following best practice of plastic part design
- Too high temperature of molten material
Solution
- Adjust the position of gate ad venting slot
- Keep uniform wall thickness
- Design boss, holes and ribs according to best design practice
- Increase the fluidity of the molten material
4. Burn Marks
Burn marks are very common in injection molding. It usually appears at the end of the flow path or where the air got trapped. Burn marks are usually black, brown, or rust-colored. Sometimes burn marks are just discoloration so the part can be used if it is not visible to general consumers. But sometimes burn marks cause some structural instability, in that case, the part is rejected.
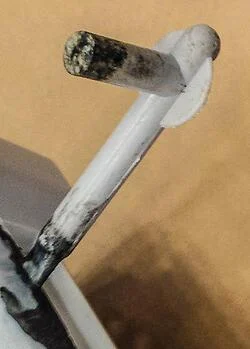
Causes
- Too high molding pressure
- Not enough vent to remove air
- Delay in removing trapped air
- Improper runner design
Solution
- Add sufficient vent holes
- Reduce the molten material temperature
- Reduce the injection speed
5. Shrinkage
Shrinkage occurs when one area of the plastic parts cools faster than the other area. Due to this, there is a shrinkage in the part which is a kind of deformation from the actual shape. So if the intended shape is a flat surface, after shrinkage it won’t be flat. It will have waviness on the surface. The same phenomenon occurs in woods that shrink during the winter months.
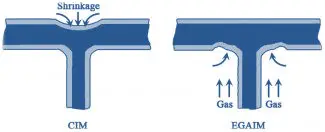
Causes
- Uneven wall thickness
- Non uniform cooling
- In efficient mold flow
- High temperature
Solution
- Design the part with uniform wall thickness
- Ensure the cooling process is smooth and gradual
- Switch to a different material that shrink less
6. Voids
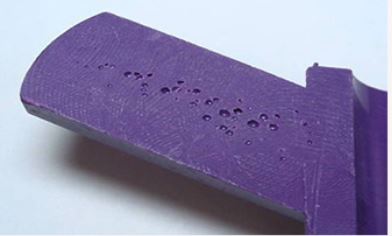
Voids are in plastic part is due to the air trapped inside. This happens when there is no sufficient venting mechanism and the air can not come out. Due to air trapped inside, molten material can not occupy the space and the part is sort-filled. Void affects the structural stability of a part if the void size is too large.
Causes
- In efficient venting mechanism
- Low molding pressure
Solution
- Raise the injection pressure
- Choose a lower viscosity plastic
- Choose a gate location closer to the thicker section of the part
7. Jetting
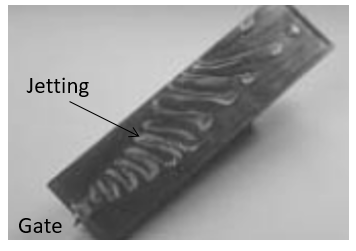
Jetting occurs when the initial shot of molten material is cooled before the whole cavity is filled. When the gate size is small and injection pressure is high, molten material often squirts rapidly through the gate and gets cooled even before the mold is completely filled. The ideal condition is that the mold should be filled gradually.
Causes
- Small gate size
- High injection pressure
- Inefficient cooling mechanism
Solution
- Reduce the injection pressure
- Increase the material or mold temperature
- Design the gate location in such a way that it can fill the cavity with uniform cooling
8. Short Shot
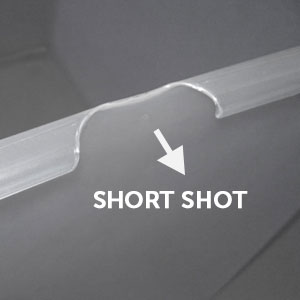
The short shot is a major defect in the injection molded parts. If the mold is completely not filled by the molten material then this problem occurs. Due to this problem, a portion of the plastic won’t have material at all so, in other words, the part will be incomplete.
The main reason for the short shot is the flow restriction due to blocked gates or narrow gates. If the material is too viscous then also short shot can happen. If the air is trapped inside then also material can not fill that area and cause the short shot.
Cause
- Low injection pressure
- Material is too viscous
- Narrow gates
- Not sufficient vents
Solution
- Increase the injection pressure
- Redesign the gate
- Provide enough vent hole for air escape
9. Flash
Flash is the extra material that comes out around the parting surface ( Where the core meets the cavity). It looks like a thin lip at the edge of the component. Flash issue occurs due to the material flows to the space outside the flow channel. Flash occurs mainly in worn-out molds. Flash is not considered a major issue unless it is an appearance part. Flash can easily be trimmed out in post-processing.

Cause
- Poorly designed mold
- Worn out mold
- Excessive injection pressure
- Low clamping force
Solution
- Redesign the mold
- Increase the clamping force
- Adjust mold temperature and injection pressure
10. Discoloration
The discoloration is when the part color is not what is intended. Sometimes the whole part gets discoloration or a certain local area gets that. This happens due to many reasons but mainly due to leftover pellets in the hopper or residual resin in the nozzle or mold from a previous production run. Discoloration does not affect the structural strength but it is not desirable for an appearance part.
Cause
- Leftover material is not cleaned in the hopper
- Poor thermal stability of the plastic material
Solution
- Clean the nozzle and hopper after every production run
- Use a color agent with good thermal stability
Conclusion: Injection molding defects
That’s all I have in this article. I hope you got an idea about the different defects that are found in plastic parts. Although there are many defects founds but these ten defects that are mentioned here are found in most parts.
If you still have any questions or queries, please write in the comment section and I will be happy to help.
You may also like to read: Sheet metal gauge chart
