Comparators are one kind of linear measurement equipment. Many similar dimensions can be checked more quickly and conveniently. In this article, we will learn about comparators with their different types, sigma comparators, their working principles, applications, advantages, and disadvantages.
What is a Comparator?
A comparator is a precision instrument used to evaluate a given component’s dimensions with an established norm. A piece of additional magnification equipment is required to precisely measure the difference in dimension between the given component and the working standard, making the comparator a form of indirect precision measurement.
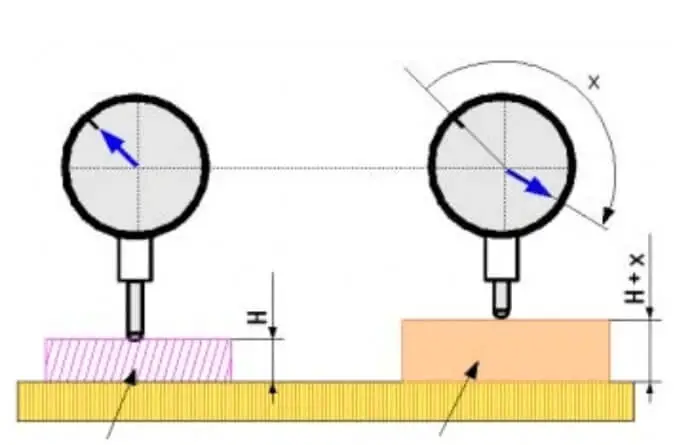
The main idea behind a comparator is to use a pointer on a scale with a high enough magnification to display the relative size of the standard and the work being measured.
By removing the potential for human error from the measurement process, precision measuring comparators can provide reliable results. They determine the extent to which a given component’s dimensions deviate from a standard.
A suitable magnification device is chosen if the suggested difference is modest to achieve the sought-after precision in measurements.
It is a form of indirect instrument that can only be used for linear measurements. The deviation from the norm, whether smaller or larger, will be displayed on the dial. It merely provides the deviation from the measured dimension’s nominal value.
Different Types of Comparators
The different types of comparators are as follows:
Mechanical Comparator
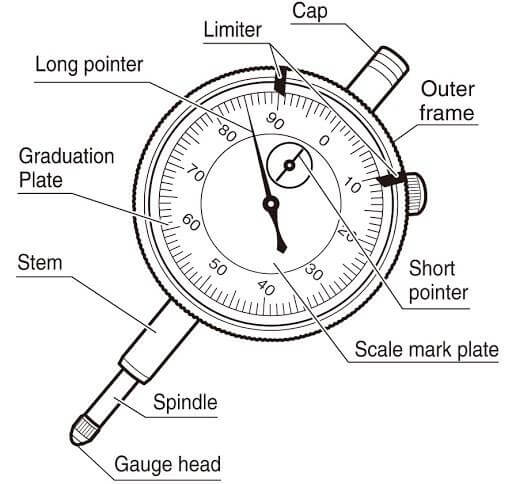
Courtesy: yoohankudtarkar.medium.com
A mechanical comparator uses mechanical techniques to amplify minor differences. All mechanical comparators use levers, gear trains, or any combination to amplify the indicator’s minute motions. Magnifications ranging from 300 to 5000 on mechanical comparators are commercially available. Most commonly, these are used in the quality control of intricate machined components.
Mechanical-Optical Comparator
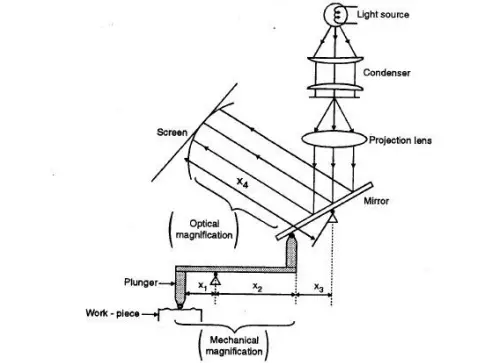
When using a mechanical, optical comparator, the measuring plunger’s minute motions are amplified by a mechanical system of perforated levers. The amplified mechanical motion is further bolstered when an image is projected onto a screen using a simple optical system.
The basic configuration is a mechanical mechanism that tilts a reflector in an airplane along an axis so an index can be projected onto a ground-glass screen inside the plane. Optical magnification allows for highly precise measurements for improved wear resistance and the absence of moving parts.
Pneumatic Comparator
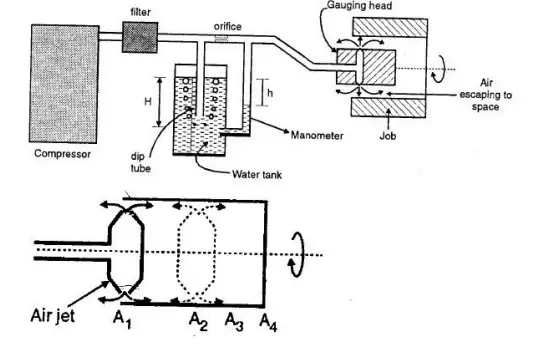
Pneumatic comparators are precision instruments that use pneumatics, or compressed air, to function. Pneumatic comparators are used to examine the dimension difference between the measured workpiece and the standard workpiece, just like mechanical, optical, and electrical comparators.
Compressed or pressured air is used as a pneumatic comparator’s working medium. As a result, there are many benefits as compared to alternatives. Due to its numerous benefits, it is typically chosen over alternatives.
Reed Type Comparator
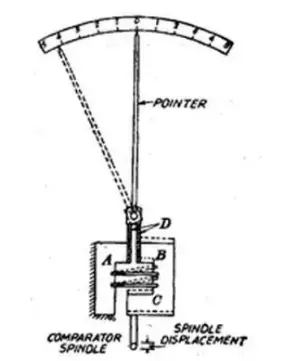
A reed-type mechanical comparator is a device that measures linear spindle displacement using a reed mechanism. A spindle motion amplifier is a tool for enhancing the effects of a tiny change in rotational speed.
The spindle can be moved straight to raise the floating block in the air. Shifting up and down, the vertical reed on the moving block slides past the vertical reed on the stationary block. Both reeds will make a sweeping motion as a result of the motion. The broader arc is due to almost an extension of the ‘M’ of vertical reeds.
Electrical-Electronic Comparator
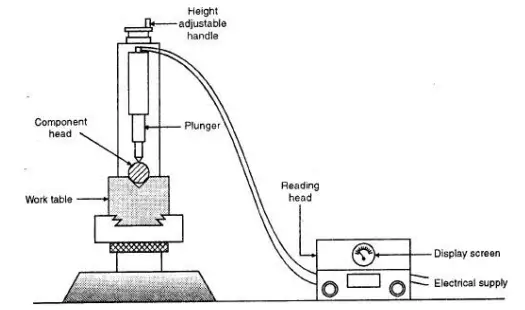
These comparators depend on a Wheatstone bridge circuit to function. When a measuring plunger moves an armature with an arm, it adjusts the electrical resistance in each arm of a D.C. Bridge.
When the bridge becomes out of balance, a galvanometer graded to read in units of linear plunger movement is employed to measure it. Batteries are used to power this circuit. The resistance ratios in the two arms of the bridge must be equivalent for it to balance.
What is a Sigma Comparator?
The Sigma Comparator was developed by an American instrument manufacturer and is a mechanical device used to compare two quantities. Their primary function is to determine how rough a given surface is by comparing the result of a measurement to the assumed value for that material. While using this comparator, a magnification of roughly 300-500 can be attained.
Construction of Sigma Comparator:
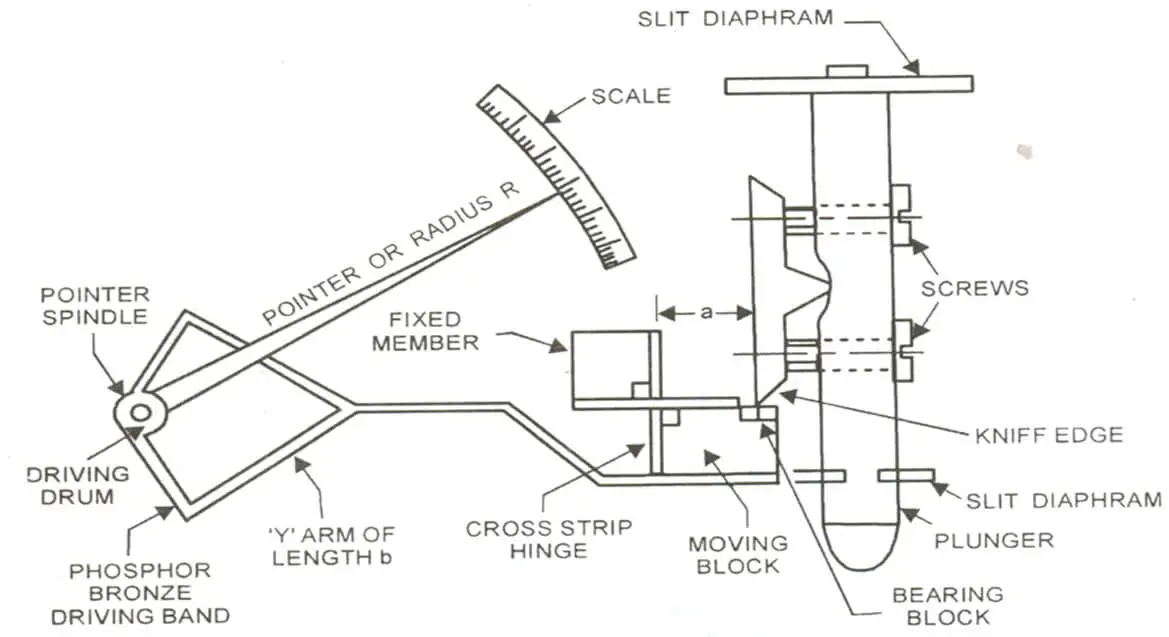
The slit in the plunger is attached to the diaphragm, which allows for frictionless linear motion. A knife edge is fastened over it, and a cross strip is located on the front of the hinge’s pivoting component.
Thin, malleable strips can be used as both the movable and fixed member in a right-angle arrangement. A lightweight Y-shaped fork arm is carried by a movable component here. This phosphor is attached to the tip of a narrow bronze ribbon shaped like a mini drum.
This Drum, which goes on the pointer, is included in the pointer. For example, if you do a vertical shift, the pointer will spin around the system.
Working Principle of Sigma Comparator:
The plunger is inserted through the diaphragm’s slit to provide a frictionless surface and permit vertical plunger movement. Where the component’s rough surface causes upward pressure on the plunger, it travels upward, bringing the knife edge.
The rising knife edge causes the pivoting block to turn counterclockwise, in sync with the upward motion of the knife edge. As the Y arm is attached to the revolving block, it revolves in tandem with its parent.
The phosphor bronze strip likewise sways in sync with the Y-motion. Arm’s When the strip is in motion, the driving drum is turned, which moves the pointer. It is how the scale’s magnified reading is obtained.
This instrument’s primary magnification is determined by the Y-arm and the length of the Y-arm; secondary magnification is determined by the relationship between the pointer’s span and the spindle’s radius.
Magnification of Sigma Comparator:
In the sigma comparator, there are two ways to get magnification.
The main magnification is found by dividing the effective length of the Y arm (L) by the distance between the hinge pivot and the knife edge (x).
Magnification =L / x
The second stage of magnification is obtained by comparing the length of the pointer (R) to the radius of the driving drum (r).
Magnification = R / r
Importance of Sigma Comparator:
Due to the positioning of the knife-edge and the cross strip, the plunger’s sharp movement was not conveyed. This sharp movement typically happens when the load suddenly jerks. When the pointer spindle is positioned with a non-ferrous disc and made mobile in a magnetic field, the comparator’s pointer provides reading with little to no oscillation.
The presence of a reflective strip in the reading scale of the sigma comparator can prevent parallax mistakes caused by the wrong viewing position of the measurement object. The whole measuring pressure range of the comparator is obtained using the magnetic plunger and a keeper bar.
Applications of Sigma Comparator:
- It is used in the assembly process.
- This kind of tool is also used in manufacturing on a large scale.
- For inspections, in the medium-sized to large workshops.
Advantages of Sigma Comparator:
- There is no requirement for a power supply because it is a mechanical comparator.
- It is small and simple to move from one location to another.
- It is simple to use; therefore, no technicians are needed.
- It costs less when compared to other comparables.
- The readings on the scale are simple to read and comprehend.
- Up to 0.25 microns is the smallest count it possesses.
Disadvantages of Sigma Comparator:
- Friction between the moving internal components reduces sensitivity and precision.
- The interior components experience wear, tear, and vibration as well.
- It has a greater number of internal moving components than other comparators.
- When using a sigma comparator for the first time, beginners can detect parallax error because some don’t have a reflecting strip in the reading scale.
Conclusion
A comparator is an apparatus that detects and enlarges a slight deviation in a measured value and then displays this data graphically with predetermined norms. A sigma comparator is a measuring tool that can take several readings from different locations on an object and compare the results.
Their primary function is to determine how much of a deviation there is between the measured value and the common value of the surface material, thus providing a quantitative estimate of the surface’s roughness.
You may also like to read: Characteristics Of Instruments


